I have enjoyed the process of designing and creating these products so much that I want to share step by step instructions with you so you can create keychains yourself if you so choose. The process of designing your own keychain is actually much easier than you probably think. If you are interested in learning how to make your own personalized keychain follow the steps below!
How to make a keychain:
Step 1: Purchase the Supplies
To begin the process of creating an acrylic keychain, you have to first purchase all of the supplies. You will need one slab of acrylic in the desired color for your design. This can be purchased at a craft store, like Michaels, or online on Amazon and Etsy. Make sure your acrylic sheet is about ⅛ of an inch thick in order to get the best results later on when we begin the process of laser cutting. Other supplies you will need are key rings to put your finished products on and an Adobe Illustrator account. Adobe Illustrator is a graphic design software that costs money, but is very necessary to have for this project. Finally, you will need access to a laser cutter machine which is imperative when it comes to being able to bring your designs to life.
Step 2: Brainstorm Design Ideas
Before you start working on Illustrator, it is important that you set aside some time to think about possible design ideas for your keychains. What I like doing is grab a pencil and paper and draw whatever comes to mind. For this example, I will be describing how you would make a keychain with your name on it; however, these instructions work for shapes as well.
Step 3: Create Your Design on Illustrator
Once you have come up with an idea for your personalized keychain, it is time to create that design using Adobe Illustrator. Begin by launching Adobe Illustrator on your computer. If you do not already have Illustrator installed on your device, you can get a subscription to the software through Adobe Creative Cloud. Next, you will want to create a new document to work on. You will do this by clicking on “File” > “New.” Now, set the dimensions of your document, you will want to create the document in inches rather than pixels so it will be easy to determine the size of your keychain. When your document is set to your liking, press “Create” to open your blank canvas. If this is your first time using Adobe Illustrator, take this time to familiarize yourself with all of the different features of the software, including the toolbar, all of the different panels, and the artboard itself. The better you understand how to navigate through this system, the easier it will be for you to generate your design. The more you work with Illustrator, the more comfortable you will become. Don’t be afraid to experiment and explore all of the features and tools that this software has to offer. Mess around with the line and shape tools to see what you can create, and even figure out how to utilize the pen tool to make different things. You’ll be surprised to see just how many things you will be able to create with just a simple understanding of the basic shapes available to you on Illustrator. You can also play around with different colors and different fill and outline options. For our keychain designs, we will be sticking to just two colors (black and red), I will explain the reasoning behind this later. If you are still struggling to figure out how to create shapes and designs on Adobe Illustrator, there are a lot of tutorials that can be accessed online, so check out some of the resources available that can help you to strengthen your Illustrator abilities.
Now that you are familiar with the Adobe Illustrator software, we can begin constructing our keychain designs. As I mentioned, these steps will allow you to learn how to create a keychain with your name on it. With that being said, the first step will be to use the text tool, or the “T” icon on your toolbar to write out your name. Simple click on the text tool then click anywhere on your artboard to form a text box. The text box will read “Lorem Impsum” which is just placeholder text. Delete those words and type your name in its place. Now, just play around with different fonts to see which one fits your style the best. Then, place a small circle near the top left side of your design. This will serve as the keyring hole.
Step 4: Prepare Your Design for the Laser Cutter
Once you have found the font you like for your name, outline your type and make the border the color red and the fill black. Next, make the outline color of the small circle you created red, but do not fill it in. If you fill it in, you won’t be able to put your design on a key ring. Anything you make red will tell the laser cutter that your design is to be completely cut through in those areas. Everything colored in black will tell the laser cutter that your design is to be etched instead of cut all the way through in those sections. Therefore, by outlining our type in red and filling it in completely with black, our name will be cut out and each of the letters will be etched to create some variation in each of the letters and to help them stand out better. Don’t forget to save your work as you go! In order to do that, you will have to go to “File” > “Save” or “Save As.” Next, export your design as a “.ai” file and send it to yourself via email. This will make it easy to access once you are at the laser cutter.
Step 5: Bring Your Design to Life
Now that you have successfully created a design, it is time to bring it to life. As I mentioned earlier, this step will be easiest if you have access to a laser cutter. Since I am a student at the University of Tampa, I have access to a room called the FabLab. The FabLab is a digital fabrication lab that gives students and faculty the opportunity to turn their designs into prototypes and products. If you also happen to be a student at the University of Tampa, this area is open to you as well, and you can use it to create your keychain!
Before you begin the process of laser cutting, it is important to note that this is a potentially dangerous activity. So, always prioritize your safety and don’t be scared to ask for help by a lab assistant if you get confused or have no clue what you are doing.
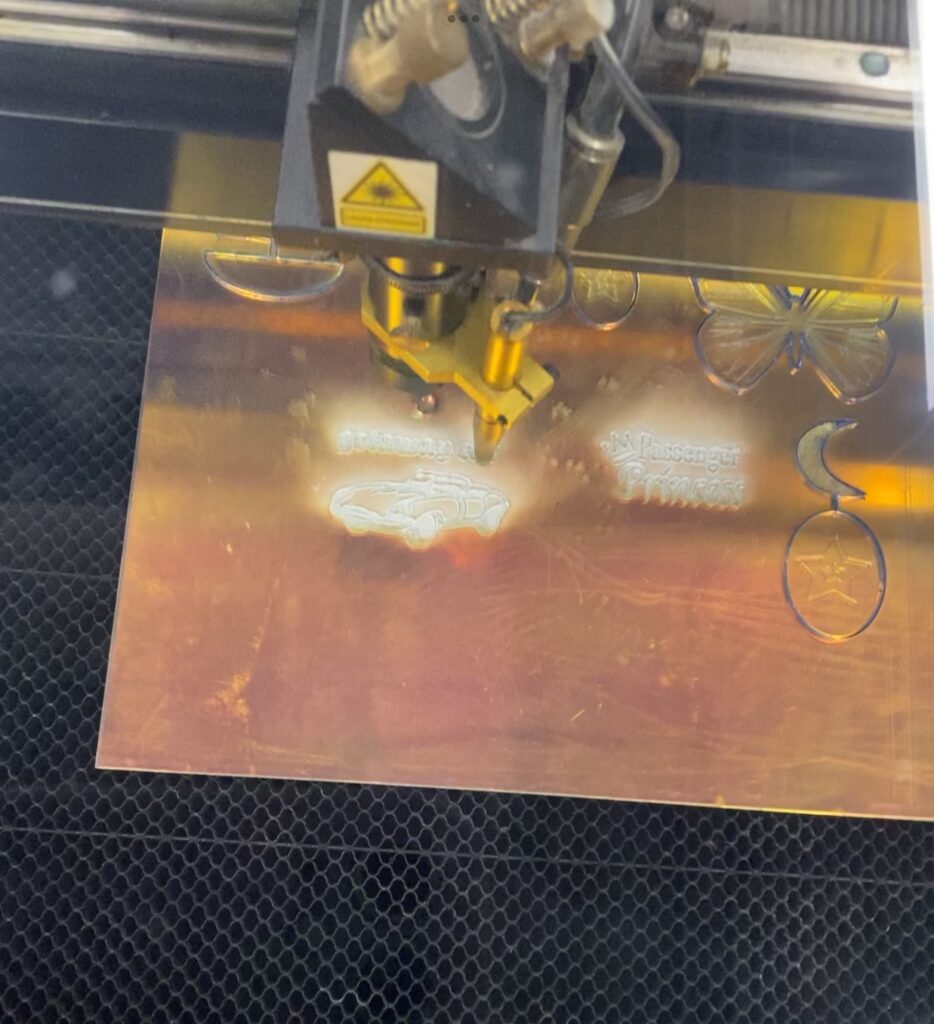
Now, you have to set up the machine. To do this you will start by turning on the laser cutter and making sure it is properly calibrated so it begins cutting in the correct area of your acrylic sheet. Next, open the laser cutter software. At the University of Tampa, this can be done on one of the computers located next to the laser cutter, however, this step may look different if you are using a machine from a different place. Now, import your vector design into the laser cutter software. This step will be easy since we already emailed ourselves our designs in the correct format. After you have done that, you can position your design on the virtual workspace so that it matches the placement on the acrylic sheet. Secure the acrylic sheet to the laser cutter bed. Double check to make sure the settings are right, then begin the cutting process. The machine will follow the vector paths you set out for it during the design stage.
Keep an eye on the laser cutter at all times to make sure it operates smoothly and does not cause any safety issues. Once the laser cutter has finished cutting out your design, allow it to cool down. Carefully remove it from the machine, then clean the acrylic piece and turn off the machine.
Congratulations! If you successfully completed all of those steps, there is a pretty solid chance that you are now holding your own personal keychain. If for some reason you were not able to finish designing your product and are in need of more in-depth instructions, feel free to watch my video tutorials on how to use Adobe Illustrator to design a keychain and how to operate the laser cutter. These videos can be extremely helpful, especially for those who are more visual learners.
Feel free to take pictures of your creations and tag @KeyPal on Instagram or Facebook! I would love to see what you guys are able to make! Also leave comments on the website if you feel like I should go into more detail for any of the steps listed above. I truly hope you found these instructions to be helpful! Happy creating!